How To Waterproof And Seal Camper And RV
Waterproof Your Camper

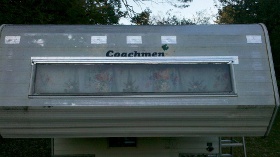
Old 1979 Truck Camper
DIY Trailer, Camper and RV Waterproofing and Sealing
This is part two of the camper and RV repair series. If you missed part one How To Repair RV and camper Roof, you may want to read that article and then come back. Or, if you are just sealing your camper or trailer seams, windows, doors, access panels and even lights; then read on.
Your camper may be leaking right now and you do not even know it. RVs, campers and trailers often leak around lights, seams and windows. They can leak for years before we even find the damage. By then, it may be too late.
By sealing your RV very well, one good time, and then applying yearly patch ups as needed - your trailer can last a lifetime. This article will concentrate on some of the important, perhaps well known areas, and even some you may not have thought of.
The camper pictured above was in very bad shape and every light socket was leaking, so they were all removed and the holes sealed with spray foam insulation, then taped off with aluminum tape coated with tar on one side. This makes a very good, permanent repair. Your trailer may, hopefully, not be that bad. But the following article will show you how to prevent such damage.

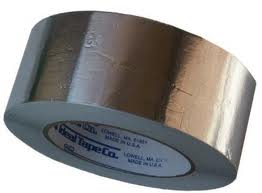
Aluminum tape
The items shown above are your weapons against water rot and leaking. You will need some RTV silicone sealant, for outdoor use, and some silver aluminum tape.
How To Seal Water Leaks In Your RV or Trailer
Wash the areas to be sealed very well. Then towel dry with a lint free towel. Use soap and water to get all the dirt and grime off the sides of your trailer. Concentrate mostly around windows, light fixtures, door frames and basically anything that protrudes from the side of your trailer. If it sticks off the side, then it needs to be sealed. Clean into the corners and cracks deep around the areas to be sealed.
Start with the windows. Run a bead of silicone around the whole frame of the window. Between the window frame and the camper siding. Be generous and make sure you get enough to seal deep into the cracks. Now, to push the silicone into the cracks, it is best to use rubber gloves, or even put a plastic bag over your hand. Use your index finger and gently push while you move your finger around the line of silicone you just spread. The idea is to push the silicone into cracks while smoothing it out nicely. Run your finger, in one smooth motion, all around the window frame. Start at one corner and work your way around the frame until you are back to the first corner.
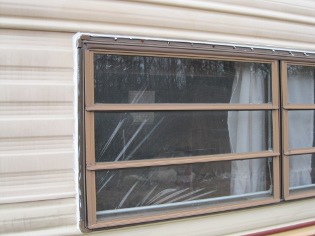
In the image below, you can see the silicone around the window frame. This may not have been leaking at the present time, but could have started to leak in the future. While you are sealing off the camper, you may as well do it all up right. Trailer and RVs are originally sealed with a type of flexible putty that bends and flexes with the motion of the RV as you travel with it. Through the years, the putty will get squashed out of the cracks and you will be left with a leak.
Silicone sealer is flexible and should last quite a few years.
Silicone Seal Around Trailer Windows
In the same way as you did the window, run some silicone around the door frames and other objects. Shown in the photo below is the hand grip between the window and door frame. This was also coated with silicone.
In the second photo you can see the side marker lights were also sealed. These are weak points in a trailer that most people do not pay attention to. In one trailer, the whole back wall was rotted out so badly that the wood was totally gone, all due to the running lights leaking through the years.
Also notice that the camper seams were coated from top to bottom. Every single seam was sealed off to ensure a water tight seal for years to come.
Sealing around lights and seams
Below you can see that the silicone sealer was also applied to the water guard above the door. This was actually leaking on the camper shown and rotted the wood over the door frame. Water ran under the guard, along the screws and into the wood. The wood had to be replaced. Notice also the light fixture next to the door was coated with silicone.
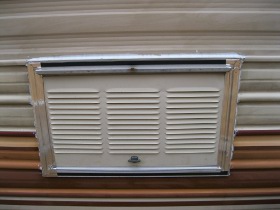
The second photo shows an access panel that was sealed with silicone and aluminum tape. The tape is relatively inexpensive at about $7 for 100 feet of it. The access panels tend to leak around the sides with age. This allows water into the trailer and onto the floor. During the years your floor will rot away, if this is not checked. If you are not going to use the access panel for a while, then tape it off with aluminum tape along the sides to keep water out. You can always simply cut it away when you need to open the panel again next season. The access panel was also coated all around with silicone first. The silicone was allowed to cure for a few days before the tape was applied.
Seal around vents and access panels
You can use the aluminum tape to cover every seal in the camper as well, to make sure it will not leak for many years to come. We have also taped above windows as well, after sealing with silicone for a permanent seal. The tape will reflect sunlight and prevent the silicone from rotting with time.
At the end of the season, check all of your new seals and make sure that none have been damaged due to the flexing caused by traveling. A trailer will flex a lot while driving down mountain trails and dirt roads, looking for your camping site. This will cause seams to be opened again. If you find any damage to your silicone, a quick touch up will make sure your trailer survives the winter and be ready for next year.
You can watch the video here: How to seal your RV or trailer and patch water leaks permanantly Pt 2
While you are over there please subscribe to my YouTube channel and follow my projects and experiments in alternate energy and electronics.
We hope you enjoyed this article.
The next article in the series shows you how to Replace Water Damaged Wood inside your camper after you have sealed it off on the outside
Feel free to ask any questions or get help with your project on our Support Forum.
About the Author
| Troy Reid |


